So at my side hustle at Paper Source Austin, I have the fantastic opportunity to teach crafting workshops, thus learning fun crafting techniques in the process. This pairs my passion of art and creativity with my passion for teaching and learning - thus, the perfect side gig for me! :)
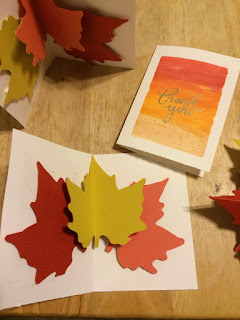
At our recent Fall Cards Workshop, we created some beautiful and fun pop-up cards using the our pre-cut Small Paper Leaves packs. One card featured a pennant-style banner that read "FALL" with some leaves hanging from either end. The other had three of the maple leaves attached together and popping up when the card is opened. I loved both so much, and wanted to use the maple leaf idea in some 4-bar Wedding Shower thank you cards.
I started by masking a border on the front of the cards with masking tape, then using distress inks with water to create my 'watercolor' effect, simply painting them on with a wide brush. I did all three cards simultaneously and had them side-by-side, which made it easy to drag the ink across the cards and masking tape between them, which allowed me to have very similar finishes. The brush I was using had firm bristles, which created a fun bit of splattering on the cards as the bristles brushed over the masking tape, so that added more fun dimension. I heat set these briefly, then let them completely air drive overnight before embossing the beautiful scripted Thank You Handwritten rubber stamp with versamark ink and Gold Superfine Detail Embossing Powder.
A

While the ink was drying, I cut leaves using my Silhouette Cameo from Persimmon, Curry, and Papaya coverstock papers (although I'd recommend using text-weight papers instead - I just didn't have any handy!). You don't have to have a Cameo for this project, since Paper Source sells the pre-cut leaf packs in-store (which are text weight! Yay!)! I took one of each color, and determined the order in which I wanted the leaves on the inside of the card (in this case, I alternated the order so that each card had a different order). Then, I took the middle leaf and used a ruler and bone folder to create a score line down the middle of the leaf. I then took the leaf that would show on the left side of the card, and made one score line that extended diagonally on the RIGHT side of the leaf from one ridge of the leaf to the stem of the leaf, and another parallel to this one about a quarter inch beside it. I repeated this with the right leaf and mirrored the score lines so they'd be on the LEFT side of the leaf.
Once you crease these score lines, you end up with a leaf that kind of curls up over onto itself. I adhered the smaller portion of this leaf curling up over onto itself to the back of the middle leaf (they should match up perfectly), and did the same with the other side, so that all three were attached together. The end result is a grouping of three leaves glued together. I took this grouping and placed six foam squares (three on each of the outer leaves), as shown in the picture, without removing the covers so the adhesive wasn't yet exposed. To install, I opened the card and lined up the score line on the middle leaf with the card's fold, then removed the three foam square covers for the leaf that would be on the RIGHT side of the card, and adhered it to the inside panel. To adhere the other side, I removed the covers to expose the adhesive on the LEFT side leaf, and then I CLOSED THE CARD on top of the leaves instead of simply sticking the leaf to the left side of the card. This insures that the leaves and card will open simultaneously when you open the card.
See? SO SIMPLE! (Okay, maybe not so simple - but it's honestly not hard to learn once you've completed one card) While my simple write-up is possibly confusing and missing some potentially helpful pictures, I hope it was helpful! I'd much rather teach it to you in person - so come check out a workshop sometime! :)


No comments:
Post a Comment