Saturday, October 3, 2015

World Cardmaking Day! Watercolor Stationary

Happy World Cardmaking Day, y'all!
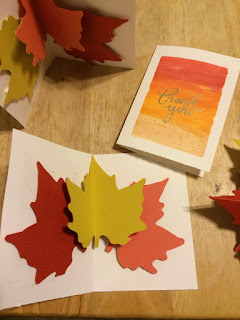
My friend will be interviewing for medical school soon, so I decided to make her some custom thank you cards for her birthday! I used superfine white A2 cards from Paper Source, and masked off a rectangle using masking tape. I then used Ranger Distress Inks and water to create my watercolors, and painted them on with a wide paintbrush. I made two of each design above, in part because I'd masked two cards side-by-side so it was easy to duplicate the watercolor patterns. I briefly heatset these, then let them completely dry and watched a movie. :)
Afterward, I heat-embossed the Thank You Scripted image (stamp from Paper Source) with Superfine Detail Gold embossing powder, and the cards were complete! My fiance cut and installed the envelope liners from the Mint Floral wrap by Rifle Paper Company. I created a quick A2 card box (following the directions from a video posted to the Lawn Fawn blog), and we had our completed gift set!
What are you making today?

Friday, October 2, 2015

Fall Leaves Pop-Up Thank You Cards

So at my side hustle at Paper Source Austin, I have the fantastic opportunity to teach crafting workshops, thus learning fun crafting techniques in the process. This pairs my passion of art and creativity with my passion for teaching and learning - thus, the perfect side gig for me! :)

At our recent Fall Cards Workshop, we created some beautiful and fun pop-up cards using the our pre-cut Small Paper Leaves packs. One card featured a pennant-style banner that read "FALL" with some leaves hanging from either end. The other had three of the maple leaves attached together and popping up when the card is opened.  I loved both so much, and wanted to use the maple leaf idea in some 4-bar Wedding Shower thank you cards.
I started by masking a border on the front of the cards with masking tape, then using distress inks with water to create my 'watercolor' effect, simply painting them on with a wide brush. I did all three cards simultaneously and had them side-by-side, which made it easy to drag the ink across the cards and masking tape between them, which allowed me to have very similar finishes. The brush I was using had firm bristles, which created a fun bit of splattering on the cards as the bristles brushed over the masking tape, so that added more fun dimension. I heat set these briefly, then let them completely air drive overnight before embossing the beautiful scripted Thank You Handwritten rubber stamp with versamark ink and Gold Superfine Detail Embossing Powder.
A

While the ink was drying, I cut leaves using my Silhouette Cameo from Persimmon, Curry, and Papaya coverstock papers (although I'd recommend using text-weight papers instead - I just didn't have any handy!). You don't have to have a Cameo for this project, since Paper Source sells the pre-cut leaf packs in-store (which are text weight! Yay!)! I took one of each color, and determined the order in which I wanted the leaves on the inside of the card (in this case, I alternated the order so that each card had a different order). Then, I took the middle leaf and used a ruler and bone folder to create a score line down the middle of the leaf. I then took the leaf that would show on the left side of the card, and made one score line that extended diagonally on the RIGHT side of the leaf from one ridge of the leaf to the stem of the leaf, and another parallel to this one about a quarter inch beside it. I repeated this with the right leaf and mirrored the score lines so they'd be on the LEFT side of the leaf.

Once you crease these score lines, you end up with a leaf that kind of curls up over onto itself. I adhered the smaller portion of this leaf curling up over onto itself to the back of the middle leaf (they should match up perfectly), and did the same with the other side, so that all three were attached together. The end result is a grouping of three leaves glued together. I took this grouping and placed six foam squares (three on each of the outer leaves), as shown in the picture, without removing the covers so the adhesive wasn't yet exposed. To install, I opened the card and lined up the score line on the middle leaf with the card's fold, then removed the three foam square covers for the leaf that would be on the RIGHT side of the card, and adhered it to the inside panel. To adhere the other side, I removed the covers to expose the adhesive on the LEFT side leaf, and then I CLOSED THE CARD on top of the leaves instead of simply sticking the leaf to the left side of the card. This insures that the leaves and card will open simultaneously when you open the card.


See? SO SIMPLE! (Okay, maybe not so simple - but it's honestly not hard to learn once you've completed one card) While my simple write-up is possibly confusing and missing some potentially helpful pictures, I hope it was helpful! I'd much rather teach it to you in person - so come check out a workshop sometime! :)

Friday, September 25, 2015

Happy National Coffee Day!

Today is National Coffee Day - clearly, one to celebrate! It's also a great excuse to make coffee-themed cards!
I've been inspired recently by Starbucks' images they're using to promote their Fall drinks. I love the use of white space surrounded by fall-themed items, and thought they would translate well to a single layer card - which works perfectly with the current Lawnscaping Challenge: One Layer Cards (http://lawnscaping.blogspot.com/2015/09/hi-there-welcome-back-to-another.html).

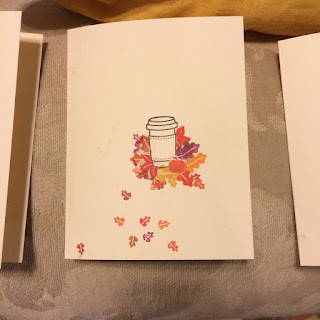
For these cards, I decided on one image I wanted in the forefront, then gradually added other images using a masking technique. For instance, in the card below, I first stamped the coffee bean, then heat set the image briefly to help the ink dry. I then stamped the coffee bean on a post-it note and cut it out (i.e.- created the mask), then stuck the mask over the coffee bean stamped on the card. Then, I stamped the coffee mug next, so that it partly overlapped the mask of the coffee bean. The effect of this is the opposite, as it makes it look like the mug is BEHIND the coffee bean after you remove the mask (but don't remove it just yet!). I then heat-set the mug image, created another mask of the mug stamp and stuck it on top of the card, being careful to keep the coffee bean mask on the page, and then stamped the next image so it overlapped the mug. 
I continued this process until I'd stamped all my images, and then carefully removed the masks. The end result is a single-layer card that has a lot of dimension without extra layers! Here are a few more Autumn-themed single-layer cards.

"So what's with all of the random falling leaves?" So glad you asked! Unfortunately, I wasn't super careful with my stamp blocks, so when I was stamping some of the images I ended up adding a small bit of ink where I didn't want it. My solution? Just add a leaf on top! This covered the mistake, and then I added a handful additional leaves to make it look more purposeful. Hooray for Happy Accidents! :)
I'vee also decided that I need to get a new black ink, as these mugs weren't as crisp as I wanted them. I think I'll snag a Memento Tuxedo Black Ink, as I see it used ALL THE TIME on the Lawn Fawn blog, and it clearly works well for others!
This last card (above) ended up being my favorite - no surprise there, with it being a Christmas-themed card! :) I can't WAIT for Starbucks' Red Cups and Holiday Beverages to return!
For the cards above, I used all Lawn Fawn stamps (of course!), pulling from the following sets: Love You a Latte, Deck the Halls, Sweater Weather, and Thank You Tags.

I'm also adding this to the Fall Coffee Lovers Blog Hop, which I just now discovered!
11997128_10207927414131352_1537800349_n

Monday, June 8, 2015

Happy 5th Anniversary!

Five years ago today, I went on my last first date ever! Phillip and I had met online and chatted for a week or so before meeting each other at the Austin Pride festival on June 5, 2010. He asked to take me out on our first date two days later to Peter Pan Minigolf, followed by Amy's Ice Cream. We're now five months away from our wedding, and I couldn't be happier!

Here's the card I made him.


On the envelope, I stamped my hand-carved groom twice, and a number of phrases like "best friend, love of my life, soon, my husband, etc."... Except I accidentally used a d in place of a b in my haste to finish it early yesterday morning!


The background was made with a hero arts stencil, and the succulents and coordinating dies are Lawn Fawn's "Stuck On You" set. The letters were an ABC Lawn Fawn set and I used hearts from a few of LF's other sets. Paper was paper bag, superfine softwhite, and chartreuse from Paper Source. I borrowed the idea for the card from another Lawn Fawnie I found on Pinterest! :)


Sunday, May 17, 2015

DIY Prism Art

I just finished creating this DIY artwork for my office! I used Paper Source coral and mint coverstock, Rifle mint floral wrap, and the prism EK Tools punch to make the triangles, then mounted most with thermoweb tape runner and popped a few up with thermoweb 3D foam squares - all from #papersourceaustin! #papersource #dosomethingcreativeeveryday


Wednesday, May 13, 2015

Lawnscaping Challenge #105: Watercolors (Entry 3)

For my last entry, I used a large round die with the globe die and partially diecut a window from the front of an A2 folded notecard, then stamped the globe (from Wish You Were Here) and colored it in with distress inks and a paintbrush. I used distress inks with a sponge to create the ombre background on another A2 panel, then adhered to the back (on the inside of the A2 folded notecard), and finished with stamping the sentiment.


This post is being submitted for Lawnscaping Challenge # 105 - Watercolors.

Lawnscaping Challenge #105: Watercolors (Entry 2)

My second entry for Lawnscaping Challenge # 105 - Watercolors also used the Stuck On You dies and stamps, along with distress inks. I added a rainbow of distress inks to a large clear stamping block, dampened it with a spray bottle, and pressed it facedown to an A2-sized piece of cardstock to create the soft watercolored panel. I then trimmed it 1/4 inch on both sides so I could center it on an A2 folded notecard to create the 1/8 inch border. I sent this piece through my Evolution die-cut tool with the two cacti from Stuck On You to create the windows, then stamped the cacti through these windows onto the A2 card before mounting with 3M Double-sided foam tape. I also stamped and die-cut the flowers and pots to add to the watercolor panel. I like the reverse dimension of this card!


This post is being submitted for Lawnscaping Challenge # 105 - Watercolors.


Lawnscaping Challenge #105: Watercolors (Entry 1)

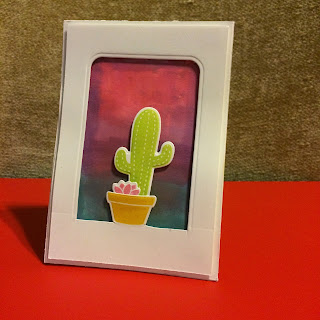
One of my favorite techniques-of-the-moment is using distress inks to create a watercolor effect, so the Lawnscaping challenge was a perfect fit! For my first project, I used the Stuck On You set with dies, and used the Tag You're It larger die upside-down to create my window. I partially die-cut the window and the pot to give the effect of a pot sitting on a window ledge, then die-cut the cactus and tiny succulent to place in the pot.

Using three distress ink colors, I made the sky background. I couldn't decide if I wanted the ombre effect with the pink closer to the bottom or the top (my initial plan was pink on bottom, but I decided to flip it at the last minute when adhering the pieces together). I adhered the watercolored paper to a folded notecard (custom-sized and slightly smaller than a traditional 4-bar card) with a taperunner, and then adhered the window and potted plants piece with 3M double-sided mounting tape. I like using this as it's slightly thinner than traditional foam squares, and I can easily tear it into strips of desired length to cover the bulk of the window panel.


On the inside of the card, I stamped three succulents from the Stuck On You set, and opted to exclude a sentiment. I sent the card today as an encouragement card to a friend going through a tough time.


Here's the finished product from the side, so you can see the depth, and the succulents inside. Enjoy! :)


This post is being submitted for Lawnscaping Challenge # 105 - Watercolors.